

NS Football
Football tactics writer and UEFA B-Licensed coach
Group A: Belgium 0-1 Spain
Game Summary
-
Spain controlled possession (60%) throughout the 1st Half, dictating play and regularly creating half-chances through wide attacks and deliveries into the penalty area
-
Spain's winning goal came from a well-worked right-sided combination, while Belgium were guilty of over-committing towards the ball and leaving the eventual scorer unmarked inside the box
-
Belgium had more possession during the 2nd Half, although this was influenced by game state
-
Despite applying greater pressure during the closing stages, Belgium struggled to create clear-cut goalscoring opportunities, while Spain managed the game effectively despite becoming less secure in possession
Starting Line-Ups
-
Belgium: 4-2-3-1 in possession & 4-2-3-1 out of possession
-
Spain: 4-3-3 in possession & 4-4-2 (high) and 4-5-1 (low) out of possession
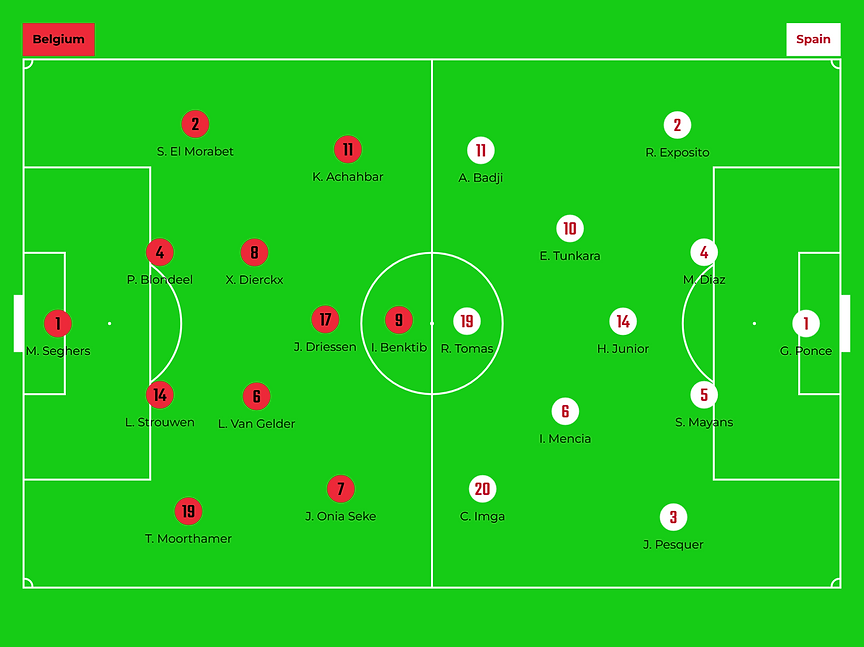
Belgium Observations
In Possession
-
4-2-3-1 structure
-
Build-Up:
-
Predominantly adopted a direct approach, looking to play early into the forward line rather than build patiently through midfield
-
When possession was established, play was frequently progressed into the wingers, particularly #11 on LW
-
-
Chance Creation:
-
Relied heavily on the individual quality of their wide players to create attacking opportunities
-
The left wing was Belgium's primary attacking outlet, with #11 regularly receiving possession to feet and attempting to create through dribbling, combination play or crosses
-
Limited clear-cut chances despite enjoying more possession during the latter stages of the match
-
Attacking transitions provided Belgium's biggest attacking threat overall
-
Out of Possession
-
Defended in a 4-2-3-1 structure high and 4-4-1-1 low
-
The system match-up allowed Belgium to defend almost man-for-man in central midfield, with #17 marking Spain's holding midfielder and #8 and #7 responsible for Spain's advanced central midfielders
-
During high pressure, #17 jumped onto the free Spain CB to support the first line of pressure
-
Pressed with good intensity but spent long periods defending own half due to Spain's dominance in possession, particularly during the 1st Half
Players
-
#1 (GK) - Mattis Seghers
-
No notes
#19 (RB) - Tinus Moorthamer
-
Endured a difficult opening period defensively against Spain's LW (#20) but responded well, making several important blocks towards the end of the 1st Half
-
91:20: Beat Spain's LB on the outside before delivering a dangerous cross into the penalty area
#14 (RCB) - Léni Strouwen
-
Right-footed
-
No significant notes
-
-
#4 (LCB) - Preben Blondeel (C)
-
No significant notes
-
10:27: Played a disguised line-breaking pass through Spain's midfield
-
-
#2 (LB) - Sami El Morabet
-
Right-footed LB
-
As frequently received under pressure on his weaker side, needed to identify his next action before receiving which he largely did successfully to avoid being caught on the ball
-
Also demonstrated good problem-solving under pressure, holding onto and manipulating the ball, and adjusting his body to create passing angles rather than forcing play
-
Provided consistent attacking support down the LW with a high work rate
-
40:02: Won an important 1v1 defensive duel against Spain #11
-
Displayed good tenacity and confidence in possession, taking responsibility to retain the ball rather than clearing under pressure
-
- #6 (RCM) - Louie Van Gelder
-
No significant notes
-
Provided build-up support and retained possession through short link and bounce passes
-
31:50: Readjusted his body well to get a shot away on target from the edge of the penalty area
-
-
#8 (LCM) - Xander Dierckx
-
No significant notes
-
Provided build-up support and retained possession through short link and bounce passes
-
10:28: Received between the lines before executing a no-touch turn, demonstrating awareness of surrounding space
-
-
#17 (AM) - Jelle Driessen
-
Occasionally dropped deeper to support 1st phase build-up - successful example at 28:20
-
24:21: Timed a run beyond the defence before delivering a cross into the penalty area
-
Ended the 1st Half with two ball losses in the final 3rd due to a lack of awareness and poor decision-making
-
-
#7 (RW) - Jayden Onia Seke
-
During the opening 20 minutes regularly dropped deeper to support Belgium's build-up
-
Protected possession well under pressure, helping Belgium retain the ball during deep build-up phases
-
-
#11 (LW) - Kiyan Achahbar
-
Displayed good composure in possession during the opening stages despite Spain's pressure
-
10:32: Attempted an ambitious through ball, recognising the most threatening forward option
-
22:30: Demonstrated good close control and decision-making under pressure
-
Around the 23rd min produced two progressive passes in the final 3rd despite close pressure
-
24:19: Played an excellent outside-of-the-foot pass into the runner, with good weight, timing and direction
-
During the closing stages consistently looked to take responsibility, driving inside to combine centrally before later delivering a dangerous far-post cross
-
-
#9 (CF) - Ilyas Benktib
-
During the opening stages repeatedly attempted runs in behind Spain's defensive line
-
Worked hard OOP, pressing Spain's CBs while attempting to block access to the far-side CB
-
Following Belgium's substitutions at 68th mins, dropped into the AM role. Indicator of versatility / technical ability?
-
-
Substitutions:
-
#20: On for #17 at 68 mins. Played CF with 9 dropping to AM
-
#15: On for #8 at 68 mins. Tall CM. Comfortable receiving under pressure and manipulating the ball to retain possession. 84:30: Escaped pressure through ball manipulation before carrying forward through central midfield
-
#10: On for #7 at 68 mins. Started as RW but moved inside to allow RB to overlap
-
#13: On for #11 at 88 mins. No notes
-
#18: On for #9 at 92 mins. No notes
-
Spain Observations
In Possession
-
Build-Up:
-
Classic Spain 4-3-3
-
Controlled possession for large periods, particularly during the 1st Half, with patient circulation across the backline
-
Similar to the Estonia match, Spain look to progress by accessing either winger early in possession, allowing them to attack 1v1 situations or combine with supporting team-mates
-
CBs regularly switched play with aerial diagonals to the wingers, helping create isolated attacking situations
-
Belgium's man-oriented midfield structure limited Spain's ability to consistently progress through central areas, resulting in greater reliance on the wide players
-
-
Chance Creation:
-
The wide players remained Spain's primary attacking threat, regularly cutting inside to combine, create shooting opportunities or deliver crosses into the penalty area
-
Combination play around the penalty area, particularly involving the wingers and advanced midfielders, created a number of attacking opportunities
-
Out of Possession
-
4-4-2 in high pressure phases
-
Pressed aggressively from Belgium goal-kicks and deeper build-up phases
-
When defending their own half and box, dropped into a 4-4-1-1 / 4-5-1 shape, with #10 dropping into the midfield line
Players
-
#1 (GK) - Guillermo Ponce
-
Right-footed
-
31:50: Produced a good reaction save to deny Belgium from close range
-
-
#2 (RB) - Raúl Expósito
-
No significant notes
-
Right-footed
-
During the opening stages appeared to prefer carrying the ball infield rather than using his weaker left foot. Retained possession in these instances
-
-
#4 (RCB) - Mario Díaz (C)
-
No significant notes
-
Right-footed
-
-
#5 (LCB) - Sergi Mayans
-
No significant notes
-
11:25: Carried out from defence under pressure, driving into midfield
-
Attempted several aerial diagonal switches towards the right wing, demonstrating a willingness to vary his passing range, although mixed success
-
-
#3 (LB) - Jordi Pesquer
-
No significant notes
-
Supported attacks on the LW with overlaps and underlaps
-
38:00: Unsuccessful attempt to switch play under no pressure, resulting in a turnover
-
Moved up to LW following Spain's substitutions in 2nd Half
-
-
#14 (DM) - Holmes Junior Zamorano
-
No significant notes
-
Right-footed
-
Belgium's man-oriented midfield marking limited his opportunities to receive possession
-
-
#10 (RCM) - Ebrima Tunkara
-
Frequently combined with teammates in central areas through first-time combinations and lay-offs
-
Regularly received between the lines before attempting to progress attacks
-
08:06: Assisted Spain's winning goal with an underlapping run into the penalty area before cutting the ball back for #11
-
25:40: Timed an underlapping run into the channel before showing good footwork under pressure inside the penalty area to create a shooting opportunity (lacked power). Although, better passing options were available
-
At times attempted to carry or manipulate the ball for too long in congested areas, leading to several avoidable ball losses / dispossessions
-
Decision-making in possession became less consistent during the 2nd Half, with a number of misplaced passes and unsuccessful dribbles
-
76:00: Timed run beyond the defensive line but carried the ball into pressure rather than releasing pass earlier
-
-
#6 (LCM) - Ian Jonatan Mencía
-
No significant notes
-
55:55: Made a well-timed underlapping run before cutting the ball back to create a shooting opportunity
-
56:40: Played a well-weighted reverse pass before immediately supporting the LW
-
57th min: Recovered well to regain possession inside Spain's defensive third
-
-
#11 (RW) - Abdou Kemo Badji
-
Left-footed
-
08:06: Opened the scoring after combining with #10 before finishing first time inside the penalty area
-
11:00: Beat his defender on the outside before delivering a dangerous low cross across the six-yard box
-
During the opening stages occasionally failed to recognise available space ahead, both between the lines and in wide areas
-
A technically gifted dribbler who frequently looked to attack defenders, although some actions appeared instinctive rather than pre-planned
-
46:30: Beat the LB on the outside before delivering a low cross with his weaker right foot
-
Between the 60th and 65th minute produced two further positive attacks from the RW, beating his defender in different ways before delivering into the penalty area
-
-
#20 (LW) - Christian Imga
-
16:00: Beat the RB on the outside before producing a composed cut-back which almost created a goalscoring opportunity
-
Frequently controlled aerial diagonal passes on chest under pressure before taking a positive first touch
-
50:40: Received in a wide position before cutting inside and producing an inventive, lofted pass over the defensive line
-
78:00: Demonstrated variety in his attacking play by making a run beyond the backline before delivering a far-post cross
-
-
#19 (CF) - Roberto Tomás
-
During the opening stages a few loose touches and misplaced passes
-
Willing to drop into midfield to receive to feet and offer a link-up option
-
Demonstrated composure inside the penalty area on several occasions by retaining possession and selecting passes in congested situations
-
-
Substitutions:
-
#16: On for #14 at 68 mins. No notes
-
#18: On for #20 at 80 mins. Played LB. Good wide freekick delivery from LW
-
#7: On for #11 at 80 mins. No notes
-
#9: On for #19 at 93 mins. No notes
-
#8: On for #10 at 93 mins. No notes
-