

U16: Italy 3-2 England (1st Game)
Updated: Sep 25
Italy and England’s men’s under-16s played a double-header at the end of August.
Here is a collection of my notes and observations from the first fixture, which took place on Tuesday 25 August at the FIGC Coverciano Technical Centre.
The notes are structured as follows. Click to jump straight to that section:
For reference, more focus was placed on the England team and players, and therefore the volume of notes for each side will reflect this. Additionally, despite this being U16 level, I still aimed to understand how each team approached the game tactically, inferring what the collective intentions were in and out of possession, and across each phase, in order to better contextualise the individual player roles, actions and performances through that lens.
Furthermore, as per my 2026 UEFA European Under-17 Championship observations - where I watched and published notes on every game - I am interested in analysing the playing styles of different age groups within national associations to better understand how players and teams are being developed through their respective pathways, while continuing to develop my Talent ID baseline and benchmarking knowledge across different levels of the game.
Starting Line-Ups

# | Italy | # | England |
|---|---|---|---|
1 | Lorenzo Minicucci | 1 | Aaron Woolford |
2 | Mirko Danza (C) | 2 | Rocco Derafaka |
5 | Lorenzo Allara | 5 | Miloh Kapotwe |
6 | Rubens Nebatumbu | 4 | Zac Wattley |
3 | Niccolò Chieffallo | 3 | Oliver Crofts |
4 | Marco Vaccarella | 6 | Arthur O’Keefe |
8 | Gabriel Tedesco | 8 | Luca Eden |
10 | Lorenzo Vitali | 7 | Eden Mahoney-Smith |
7 | Sean Luis Ebagua | 10 | Luis Munoz (C) |
9 | Lorenzo Sassetti | 11 | Jaice Dore |
11 | Leonard Maria Lima Ramalho | 9 | Jaden Maghoma |
Substitutions | |||
60th | 61st | ||
71st | 70th | ||
74th | |||
84th | |||
Scroll right for England team if viewing on mobile
Goal Summary
0-1 (3rd min): #8 Eden scored after chopping onto his right foot inside the box before powerfully shooting across goal into the far corner, following an England build-up sequence on their left wing that started at left-back and involved a diagonal carry inside from #11 Dore and an overlapping run from #8 Eden.
1-1 (13th min): #11 Ramalho scored with a free header from around the penalty spot following an outswinging corner kick.
2-1 (34th min): #9 Sassetti scored with an accurate first-time shot across the goalkeeper into the bottom corner from a cutback, following an attacking transition after England lost possession around the halfway line on their left wing during a build-up attempt.
2-2 (44th min): #9 Maghoma scored with a sliding finish from close-range after a low cross across the face of goal from #8 Eden, following an underlapping run from #8 Eden and a diagonal pass inside from #11 Dore.
3-2 (76th min): Substitute #20 Pica scored after intercepting a risky short pass from England substitute goalkeeper #13 Thomas Armytage to the edge of his own box.
England Team Observations
In Possession
A key feature of England’s possession phase was deep build-up, with recurring patterns of play attempted and executed to progress into the opposition half and create England’s desired conditions for chance creation.
These build-up patterns occurred mostly in wide areas, predominantly on their left wing, with the collective intention of bypassing Italy’s narrow forward and midfield lines in their 4-1-3-2 defensive structure to attack the exposed backline, defensive midfielder #4 and available space at speed.
England typically played short from goal kicks, occasionally opting to go long into the forward line. But whether the route around, which was most frequently utilised, or over Italy's first lines of pressure was taken, their 4-2-3-1 shape remained consistent. However, the double pivot of RCM #6 O’Keefe and LCM #8 Eden rarely operated on the same horizontal line, with the latter advancing higher, often positioned on the blindside of the Italy RCM, within the inside left channel.
Additionally, rather than solely relying on deep restarts to implement their main attacking tactic, England repeatedly recycled possession back to their goalkeeper when unable to directly and quickly penetrate the Italy defensive line. As a result, England had few prolonged spells of possession in the final third.
This intentional tactic of reinitiating the deep build-up phase gave England's players the time and opportunity to re-establish their 4-2-3-1 shape, while, equally importantly, encouraging Italy to collectively push up the pitch and reform their high defensive structure. This enabled England to recreate the build-up scenario they wanted and had clearly prepared for, creating the opportunity to generate their desired attacking conditions if they successfully progressed.
Due to the narrowness of Italy's high 4-1-3-2 out of possession structure, the England fullbacks, positioned deep and wide, were consistently free to receive from the centre-backs or directly from the goalkeeper. Once in possession, this was a trigger for Italy's outside central midfielders (#8 and #7) to jump out from their initial central starting positions, causing a collective lateral shift across from Italy’s midfield diamond.
England repeatedly looked to trigger this defensive reaction from Italy and then attempted to exploit the attacking openings that emerged. The lead-up to the first goal in the opening minutes was a clear example of England's offensive game plan in practice.
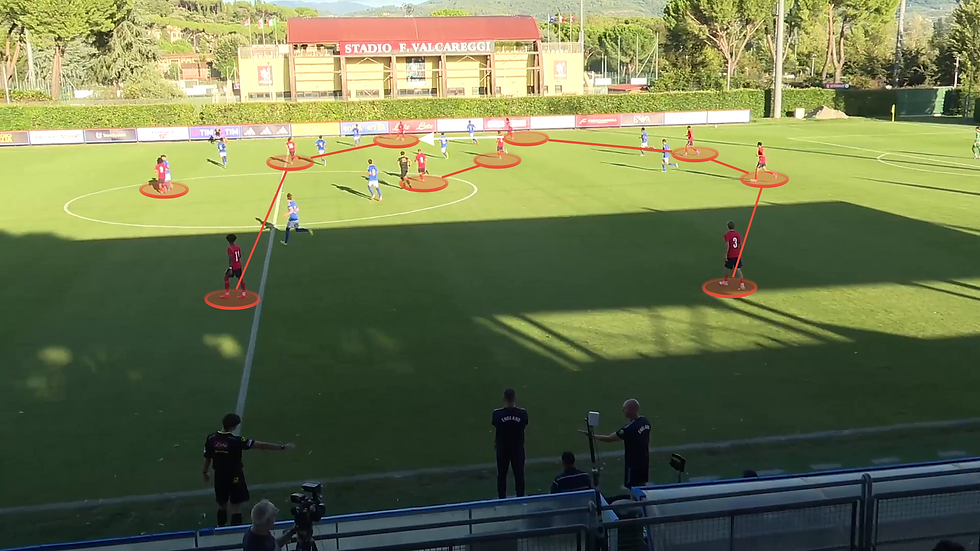
England, in their 4-2-3-1, played around Italy's high pressure with a pass from their goalkeeper to the free right-back, who played forward first-time into the feet of the right winger, who had dropped deep to receive (shown in the image above). From here, the right winger recycled play to the goalkeeper, as no immediate forward or inside options were available or safe, but this also enabled England to centre the ball and reinitiate their build-up phase from a more favourable and controlled position.

As the backwards pass travels towards their goalkeeper, England's players react to reform their base build-up shape. The backline required the most urgency, with the centre-backs splitting and opening up, and the left-back (dashed arrow) positioning himself deeper and wider. Elsewhere, the left winger pulled wider, and the LCM (line arrow) dropped quickly so he was in position to exploit any jump from Italy's RCM.
From an Italy perspective, the team reformed its 4-1-3-2 high defensive structure, with the two highest defensive lines pushing up the pitch. In the image above, the distance the Italy RCM would need to cover to close down the England left-back is visible, without the need for any telestration.

The unpressured England goalkeeper clipped an accurate pass into his left-back, who played first-time into LCM #8 Eden, who accelerated his movement to exploit the space vacated by Italy’s RCM as he arrived to press the England LB (and not for the last time).
In the image above, the physically demanding lateral distances Italy's midfield were required to cover out of possession are evident. In addition to the physical demands, there were also cognitive demands on their DM #4 Vaccarella, who had to continuously provide cover behind his three advanced midfield teammates and switch his marking responsibility in the process, all while trying to provide central coverage in front of the backline.
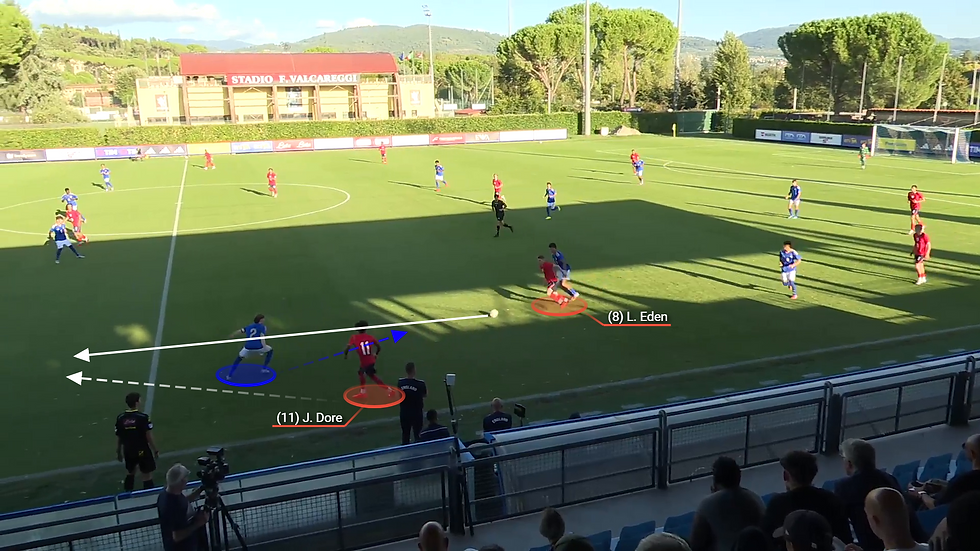
After receiving, #8 Eden withstood the physical pressure from behind and protected the ball with his front leg and then foot before carrying and poking it past the onrushing Italy right-back, who thought he could win the travelling ball.
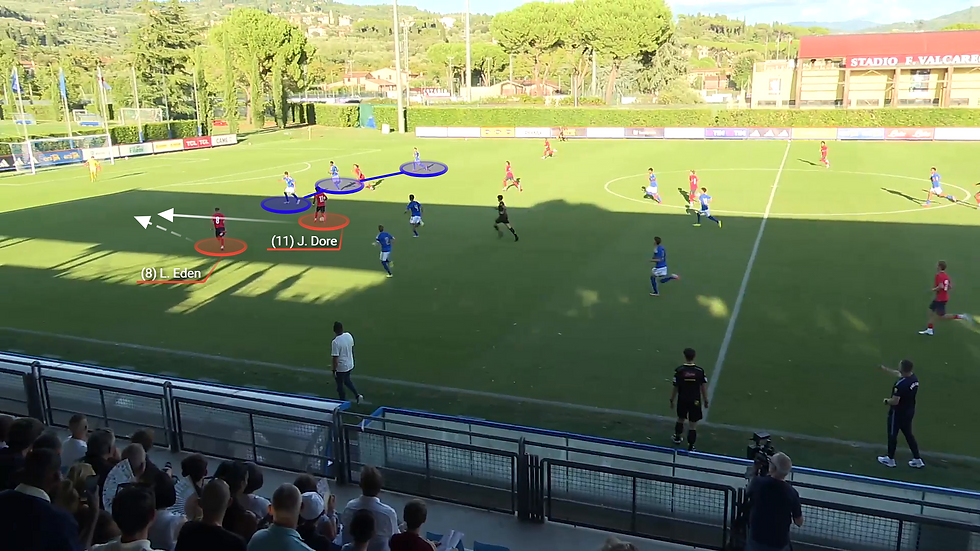
Left-winger #11 Dore collected the loose ball and then carried diagonally towards goal, fixing the Italy RCB before sliding the ball outside to meet #8 Eden's overlapping run as he arrived in the box. From here, #8 Eden used the overly aggressive closing down of the Italy RCB (no deceleration) to his advantage, going against his momentum to chop onto his right foot and whip a powerful shot across goal into the far corner.
The above scenario illustrates a number of the attacking conditions England aimed to manufacture through their deep build-up play in order to create chances. The ultimate objective of manipulating Italy's defensive system was not to simply progress up the pitch and initiate spells of controlled and sustained possession in opposition territory, where the team would patiently circulate and probe to unlock the Italy low block. No, instead, the collective attacking intention was to entice Italy high, go around their forward and midfield lines, and then attack directly and quickly with their own forwards, specifically wingers, and support runners.
As seen in the sequence above, by accessing the space behind Italy's midfield line England could pull out and/or overload the Italy DM #4 Vaccarella and attack the exposed and disjointed Italy backline, who had half a pitch to cover. With the Italy fullbacks tasked with tightly marking their corresponding England winger, not only were 1v1 scenarios created but also gaps between the Italy fullbacks and centre-backs that England looked to frequently exploit with passes and runners beyond.
Furthermore, with England building up in wide areas, they often created opportunities to execute switches of play to the Italy weak-side, for quick attacks on the opposite flank, as per this sequence from the 16th minute below.
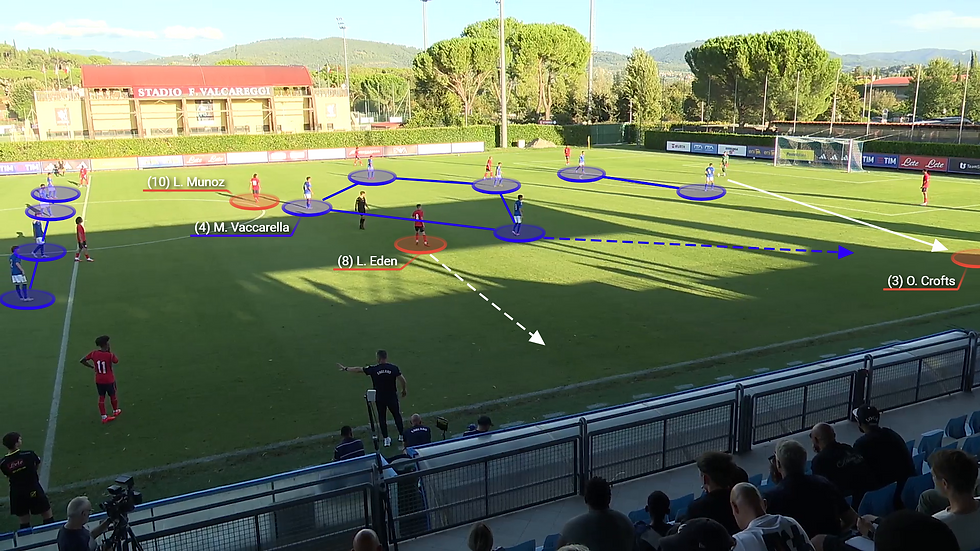
The ball is with the England goalkeeper, and both teams are in their corresponding shapes. England resemble more of a 4-3-3 due to #8 Eden's higher (blindside of the Italy RCM) and #10 Munoz's deeper starting positions, which creates an overload around the Italy DM #4 Vaccarella. A pass is made direct to left-back #3 Crofts, triggering a jump from the Italy RCM and a move out wide from England's LCM #8 Eden.
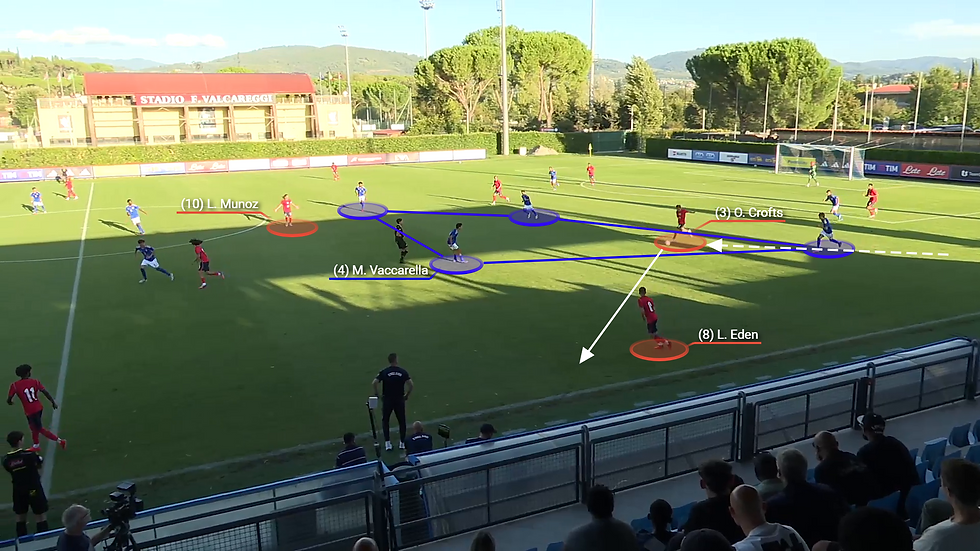
#3 Crofts uses the Italy RCM's pressing momentum and angle of approach (blocking the line pass) against him to cut inside and carry before finding the free #8 Eden wide. In the image above, you can also see how England have created the potential for a riskier pass into #10 Munoz, positioned centrally between the lines, and a 4v4 against a retreating Italy backline, who have half the pitch to cover, through this pattern of play.
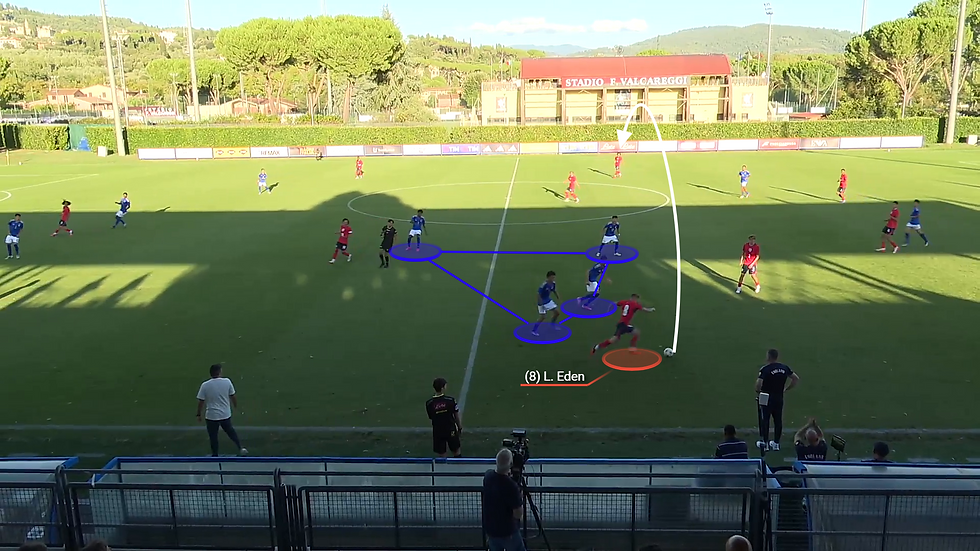
Instead, #8 Eden opted to switch play to the RB, free on Italy's weak-side, with their midfield diamond all congregated on the ball-side. The England RB and RW exchanged a few passes to progress into the final third before the RW's pass into the box for the RB's underlap is overhit and cleared, leading to an Italy attacking transition.
As seen in the two example passages of play, typically, once England bypassed Italy's first lines of pressure, they looked to quickly find a winger to feet. This was made easier with build-up starting in wide areas. From there, the winger would take the creative onus, looking to carry or play a penetrating pass inside or beyond for runners ahead, with #9's short darts offering a constant threat in behind, #10 making underlapping runs on the RW with the RB providing an overlap option, and #8 overlapping and underlapping on the LW.
While England achieved multiple successes in the build-up phase of their offensive gameplan, chance creation and end product were more mixed. With the majority of attacks being funnelled into the two England wingers, the reliance on the pair to then not only create, but to also do so quickly (a clear team intention), sometimes compromised their attacking quality and decision-making.
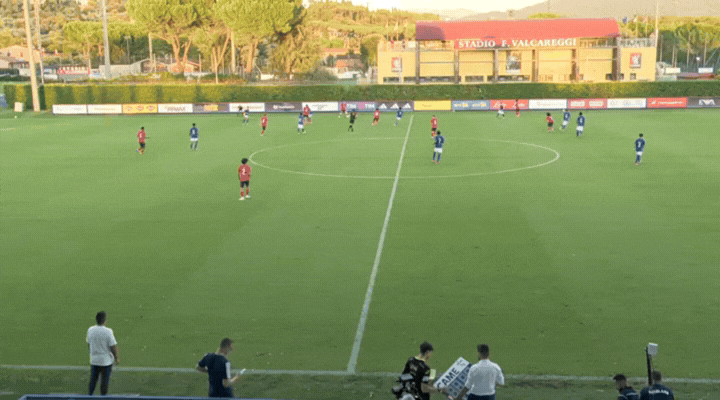
A number of England's most promising offensive moments came when #8 Eden and #10 Munoz became involved. This was evident in the 1st Half and early in the 2nd, where the pair were involved in two instances of third-player combinations that led to attacks. The first, in the 50th minute, ended in a blocked #7 Mahoney-Smith shot from the edge of the box, while the second, in the 58th minute, can be seen below.
Following England's two sets of substitutions in the 61st and 70th minutes, the full starting XI changed, but the in-possession plan remained the same. The only difference was that the attacks began to have a right-wing bias, with RCB #12 Boggan, RCM #18 Robinson and RW #23 Semakula all frequently involved and worthy of honourable mentions, although the lack of end product from #23 Semakula, both in terms of decision-making and execution, was a familiar theme and did not match the quality of his involvement in the lead-up to these attacks, specifically his sharp separation movement and one-touch combination play.
Overall, England displayed a number of positives, both collectively and individually, in possession. The main shortcomings were in their final-third actions and decision-making, but given a) the level (U16) and b) the tactic of attacking quickly, these can be understood and developed.
On the flip side, while England's offensive gameplan revolved around deep build-up, followed by fast attacks - and this did generate success - a big part of Italy's gameplan centered on attacking transitions. Italy's out of possession structure, namely having two central forwards to utilise upon regain, aided this tactic, with an immediate advanced option available.
Couple this with the fact that England's deep build-up increased the opportunity for Italy to capitalise upon high regains - as occurred for their second and third (winning) goals - and it was very much a risk-versus-reward in-possession approach.
Out of Possession
England had the larger share of possession throughout the game (55%) and had more than 60% in the second half, but Italy came out on top in the key attacking metrics, namely xG, shot volume, and most importantly, goals.
The majority of England's out-of-possession requirements involved dealing with Italy's direct balls into and beyond their forward line and vertical counterattacks, both of which Italy were effective at. Overall, Italy generated 23 shots, including numerous 1v1 situations with the England goalkeeper from attacking transitions.
One interesting aspect of England's out of possession approach was how they planned to deal with Italy's 4-3-1-2 in-possession system.
From Italy goal kick and deep build-up scenarios, England employed an aggressive 4-2-4 high block that initially prioritised blocking central areas of the pitch and then jumped man-to-man on the ball-side when possession was played wide, with the far-side fullback tucking inside to provide central and numerical coverage in the backline.
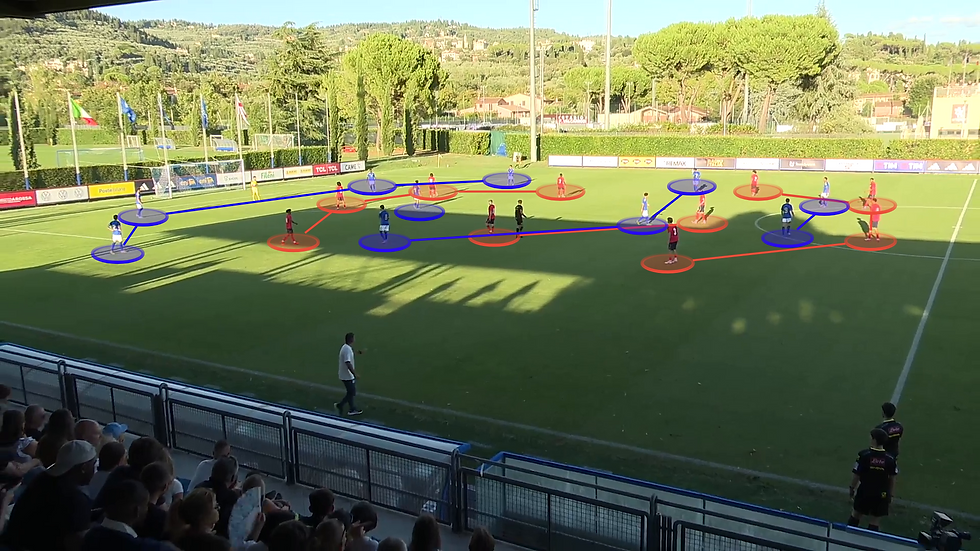
As the overly telestrated image above hints at, the roles and responsibilities in the England high-pressure phase were as follows:
Forward Line: #9 and #10's first reference point was to block any direct passing lane into the Italy DM, before the ball-side CF jumped up to close down the Italy CB in possession while the other dropped to cover the Italy DM. England seemed prepared to allow Italy to switch play back-and-out via their goalkeeper and far-side centre-back, with their far-side winger high so accessible to close down the far-side CB, while also recognising that Italy were primarily looking to go long directly, so this was rarely an issue.
Midfield Unit:
Wingers: From their initial high starting positions, the ball-side winger jumped up and out to their fullback when the ball was played wide, while the far-side winger tucked in to maintain horizontal compactness for the team.
Central Midfielders: #8 was slightly more advanced, giving him access to both jump up and support high pressure moments, including closing down the Italy DM if needed, but also being within accessible distance of #6 to provide central midfield cover. #6 sat deeper, able to cover the Italy AM (#10) and provide central midfield coverage and connection with the backline.
Backline:
Fullbacks: Both fullbacks initially started higher (on the same horizontal line as #6) and narrow, with the ball-side fullback aggressively jumping up and out to cover the ball-side Italy outside CM when the ball is passed wide, while the far-side fullback lowered onto the same horizontal line as the deepest CB to provide 2v1 coverage.
Centre-Backs: Man-mark Italy's two forwards.
The far-side fullback coverage in the backline and fast recovery runs were regularly required to deal with Italy's direct play. The two images below show this in action, following an Italy goal kick earlier in the game.
Interestingly, and as an aside, in this instance, England had formed a 4-4-2 midfield diamond block, with #8 positioned much higher and nearer the Italy DM. Perhaps this was situational. Or maybe, due to their knowledge that Italy were happy to bypass their DM in deep build-up, England could afford - and would benefit from - keeping an extra player deeper to compete for second balls and decrease recovery distances. If so, this would suggest an in-game tactical adjustment.
Anyway, back to the action that highlights England's fullback coverage in the backline and fast, collective recovery runs. First, the Italy left-back clipped a ball into their most advanced forward, who was tightly marked by the England LCB, before he flicked in behind for #10 to run onto, only for the covering LB #3 Crofts to regain and recycle possession.

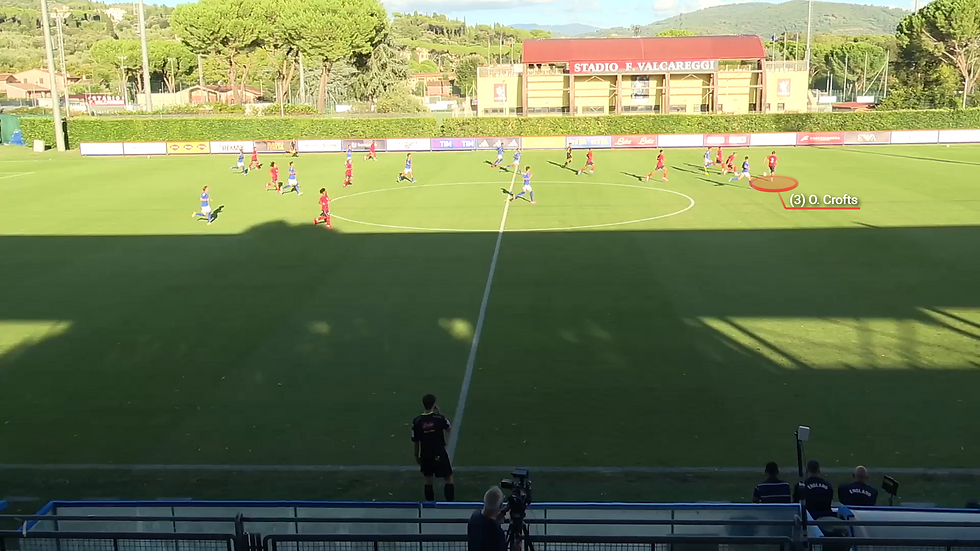
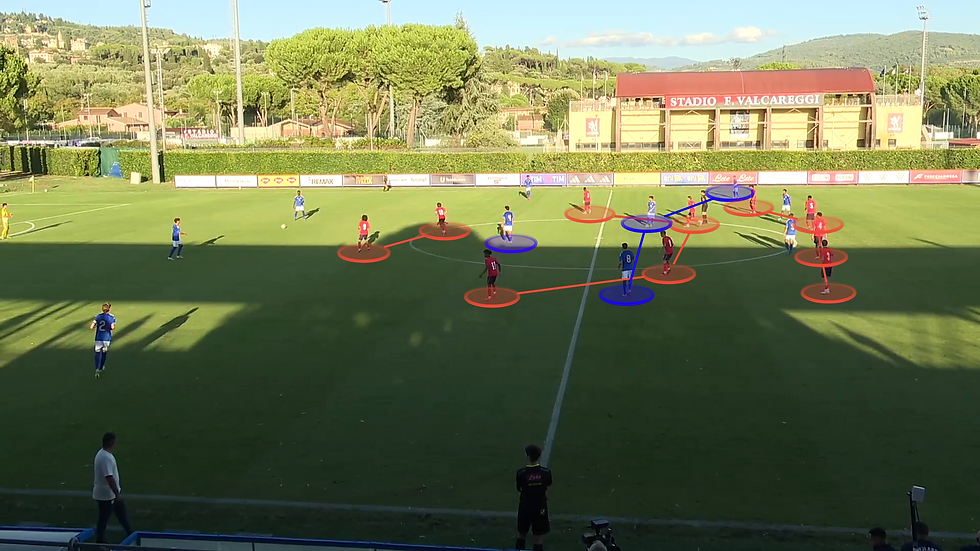
During the brief periods Italy did circulate possession along their backline, before going direct towards the forward line, England formed a horizontally and vertically compact 4-4-2 mid-block. In these scenarios, the forward line would be responsible for covering the Italy DM, with the pair switching between one engaging the CB in possession while the other dropped to cover the Italy DM. This allowed the England LCM to position himself deeper, alongside the RCM.
In the image below, the above detail can be seen in practice. Additionally, note how the Italy LCM was positioned wider in this instance, a tactic that either outside Italy CM could employ. England's solution to this was to stay compact and central, encourage passes wide and then collectively shuffle across the pitch as the ball did, ensuring their wingers and fullbacks were within short distance to aggressively close down if any passes reached wide areas.
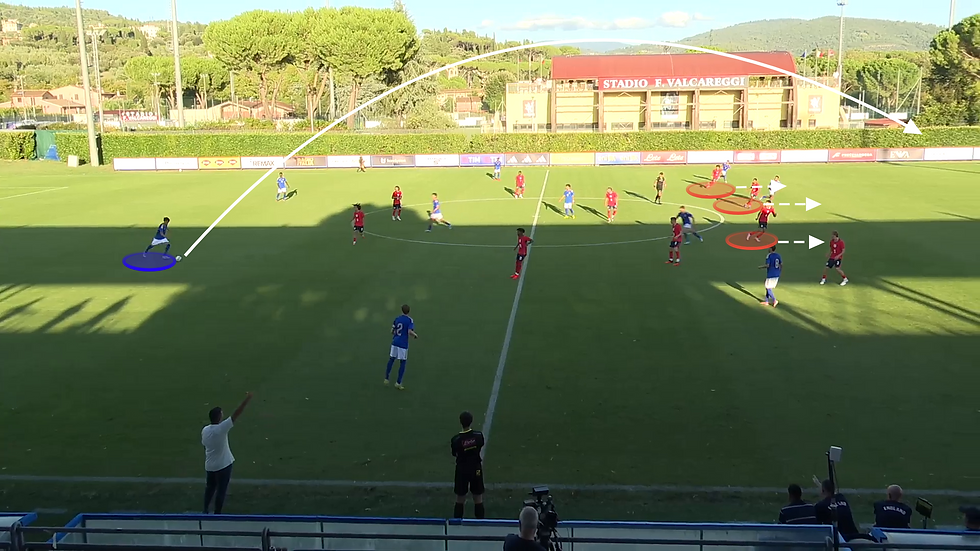
However, as frequently mentioned, Italy's main tactic in possession was to be direct, typically going over England's backline with willing runners behind and quick support from underneath. Therefore, England's backline needed to be prepared for running back towards their own goal, a lot.
Picking back up from the above mid-block sequence, below, you can see how once the cues were evident that Italy were going to go long - no pressure on the ball, threat behind and obvious body shape - three England defenders were on the half-turn and ready to run backwards.
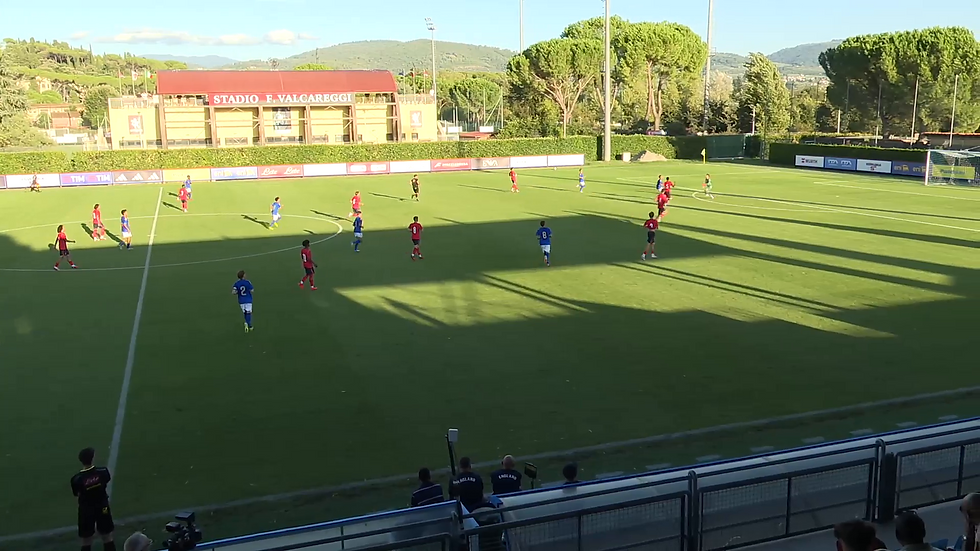
Adding further protection for balls over the top was the England goalkeeper, who made two headed clearances when sweeping behind his backline in the 1st Half.
But both of the above passages of play, a restart and settled possession spell, were easier for England to anticipate and get organised defensively. There were plenty of chaotic, transitional and contested periods, where multiple turnovers occurred and England were not set in an organised block, and their players had to dynamically react.
As highlighted, recovery runs by the backline and central midfielders, which DM #6 O’Keefe consistently made, were one collective tactic England employed to deal with this inevitable game state; getting bodies back, around the ball and into the box, to duel, block and clear.
Another was the reliance on defenders being able to cover large spaces, by defending 1v1, delaying attacks, and making constant positional decisions and adjustments. Both centre-backs faced multiple instances of these scenarios, having to run back towards their own goal, or into channels, with an attacker in possession or chasing a forward ball, and make split-second, micro-decisions on the best defensive course of action.
The GIF below shows an England defensive transition after losing the ball in the final third. This sequence shows a number of the aspects described in the three paragraphs above, especially the split-second, micro-decisions England defenders, specifically the centre-backs, were required to make.
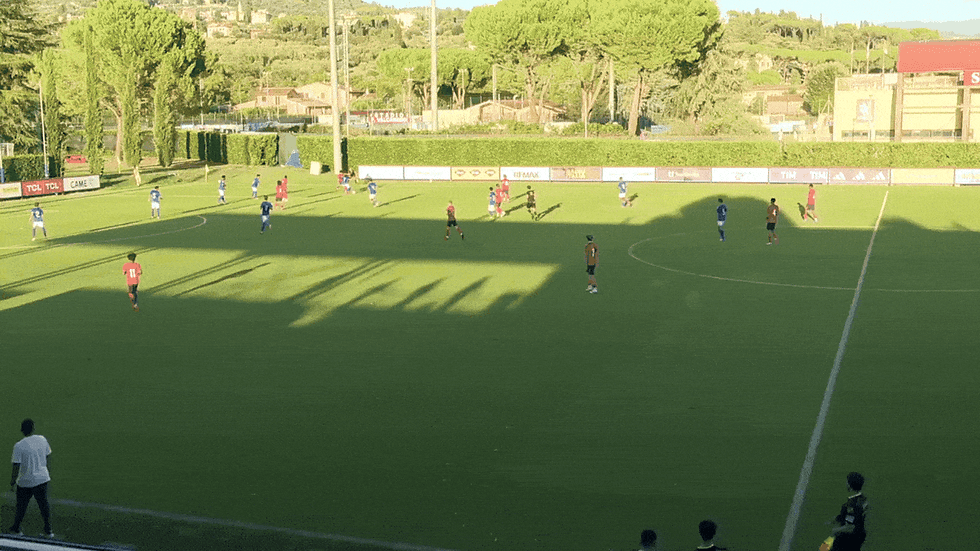
In the above scenario, firstly, the England RCB, who even before the turnover needs to consider his rest defence position, chooses the risky slide tackle option on the halfway line, knowing failure to execute would leave his side in a dangerous 2v2 situation. Note the immediate reaction, however, sprinting back to recover and support his teammates inside the box.
Secondly, the England LCB showed his defensive anticipation, beginning to drop as soon as the transition initiated. He then showed his defensive awareness to scan and see his left-back providing cover on the other Italy forward, which informed his decision to begin closing the distance to the Italy attacker carrying the ball by continuing to drop diagonally to narrow the available shooting angle. While the attacker still managed to get a shot off, the England LCB kept the attacker on his left-foot, and his calmness in dealing with the situation without over-committing provided sufficient delay for his teammates to recover and block the rebound, with full credit going to #6 O’Keefe for that action.
There were plenty of other instances where the England centre-backs, and at times the fullbacks, made 'successful' and 'unsuccessful' defensive actions. However, a more detailed and focussed watch is required to ensure outcome bias is reduced as a factor in assessing their decision-making.
England Player Observations
#1 Aaron Woolford (GK): Made multiple saves throughout, the most important of which came from several 1v1 situations. While a number of these shots were aimed directly at him (or at least within short reach - see overall Italy shot map below), he was consistently in position and frequently shuffled forward to close down the attackers' shooting angle in the 1v1s.

In the 1st Half, and due to Italy's long ball approach, he effectively performed the sweeper-keeper role on occasions, dealing with balls played over the England defensive line with his head and feet, both clearing and retaining possession on a few occasions too.
In terms of distribution, he executed a mixture of long and short passes but was rarely required to execute these under any real pressure. Woolford appeared capable with his longer distribution, generally directing passes in the vicinity of the England forwards to win or compete for.
He was heavily involved in (re)initiating England's deep build-up, and due to England's tactic of going around the Italy block, these typically involved passes short to the nearby split centre-backs, or wide to the deep fullbacks, with very few attempts made to play through, into central midfield. His pass quality in these instances, namely the weight and accuracy, was better to the centre-backs compared to the fullbacks. The centre-backs typically received on their back foot, allowing them to play forward on their first action, whereas a number of his passes to the left-back in particular were under hit or behind him, slowing the immediate progression opportunity.
#2 Rocco Derafaka (RB): In deep build-up, Derafaka's role was to position himself wide right to receive passes around the Italy block, then quickly play forward to the England RW, and make supporting overlapping or underlapping runs in the opposition half. His final third involvements were limited throughout due to a lack of opportunity to perform, so his attacking contributions were primarily supportive off-ball runs, as opposed to on-ball actions. Nevertheless, he continued to provide attacking support on the RW during his 65-minute display.
Due to his relatively simplified role in-possession - receive wide and immediately pass to the RW who typically dropped to receive to feet - Derafaka was generally successful in performing this repeated action, even when under pressure, as he was clearly prepared for these exact build-up conditions. There were a couple of ball losses in the 1st Half, following rushed passes and clearances; these all occurred in transitional moments when Derafaka was not in his familiar right-back area and therefore less aware of his surroundings and next course of action.
From an out-of-possession perspective, his main responsibilities were to press aggressively in high defensive phases, and specifically when the ball was wide on his side. This involved applying pressure from behind, typically to the Italy LCM, ensuring he was unable to turn and play forward if he received, which he performed when required, forcing a couple of turnovers.
Due to Italy looking to play over the opposition backline and their counterattack threat, coupled with England's high pressure and his specific role within that system, Derafaka needed to make frequent recovery runs to get back into defensive position. His recovery anticipation and speed can be developed, alongside tucking inside to limit the distance between himself and the RCB when the far-side and covering defender.
#5 Miloh Kapotwe (RCB): Kapotwe had mixed success in his defensive duels, which, due to his team's out-of-possession approach and specific role within it, he was required to face frequently. In high-pressure phases, namely Italy goal kick restarts, the RCB locked on tightly to his Italy forward, showing no hesitation in tracking, even when his opponent dropped deep into his own defensive third. In these front-footed defensive moments, his aggression had its advantages, forcing some turnovers.
However, this aggressive marking also proved his downfall on occasions, losing physical battles against Italy #11, often from over-committing to nicking the ball in front of the attacker when he was neither the favourite nor required to win it, leaving himself and his backline vulnerable as a result. There was also the aforementioned mistimed slide tackle attempt which left him out of the game and put his side in a dangerous 2v2 situation, but in this and the other situations, Kapotwe showcased his willingness and pace to recover into position. Also, due to the volume of his defensive actions, Kapotwe did have some success when covering depth in the right-wing channel and 1v1 inside his own box.
There was also a moment early in the 2nd Half where Kapotwe displayed defensive anticipation and damage-limitation decision-making in a defensive transition. While this action did result in an Italy shot on goal, it's a useful demonstration of a) a defender influencing a situation without any direct involvement and b) the split-second, micro-decisions players, in particular defenders, are constantly required to make, often deciding between the lesser of two evils.
This sequence started with an Italy goal kick and England in their high, aggressive starting positions. As Italy played out to their right-hand side, and therefore Kapotwe (#5) became the far-side centre-back, he dropped slightly to take up a covering position in the backline as the deepest defender, all while on the half-turn, maintaining a goal-side and ball-side position relative to his mark (Italy #11) and remaining within short distance.
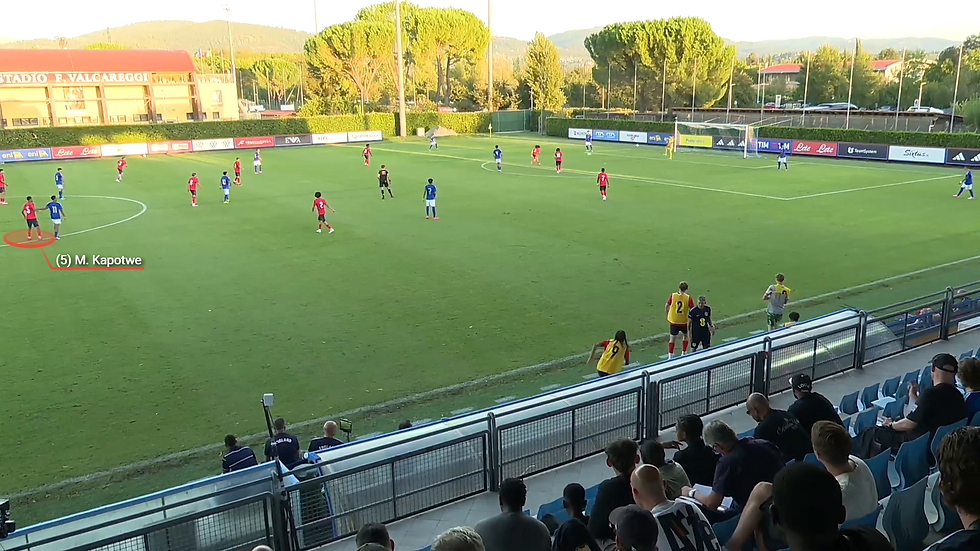
When it became clear that his centre-back partner #4 Wattley was going to advance, and therefore vacate his mark (Italy #9), to intercept the looping ball forward, Kapotwe dropped a couple of extra yards to the halfway line (first image), before beginning his sprint back towards his own goal when the ball ricocheted to Italy #9, creating a 2v1 attack (second image).
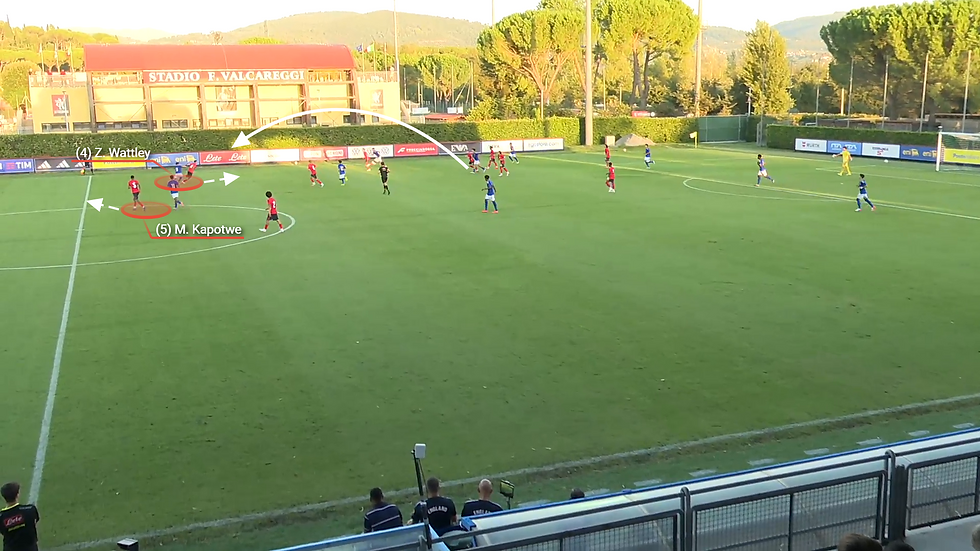
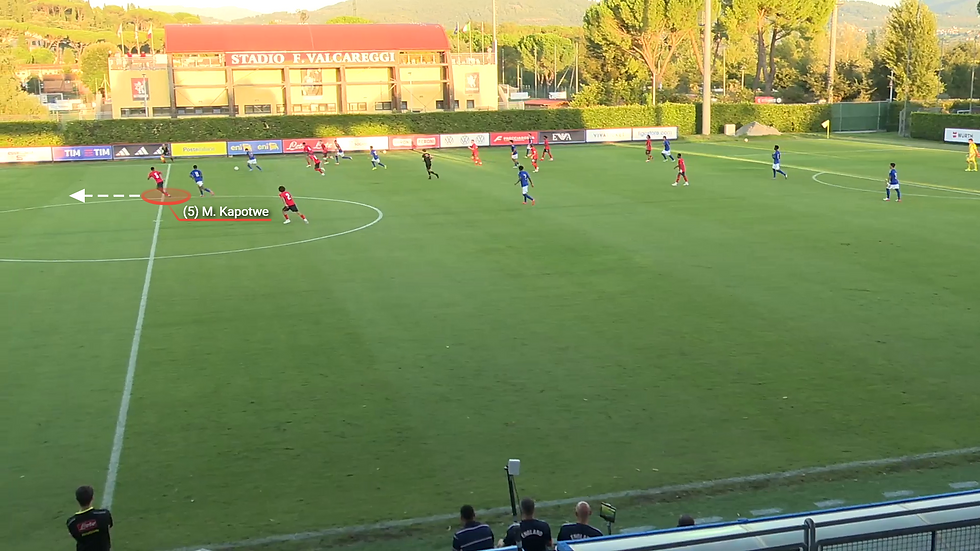
While travelling back towards his own goal, Kapotwe scanned for references to inform his decision-making process, importantly between the ball-carrier's touches. Firstly, checking over his left shoulder into his blindside, where he could see the running line of the Italy #11 and the position of the England RB, who was not in position to provide cover for the Italy #11.

Next, a look over his right shoulder towards the ball-side, where he could continue to monitor the direction of the ball carrier, see teammate #6 O’Keefe accelerating back (potentially quick enough to recover and apply pressure to the ball carrier), and check the supporting runs of other Italy attackers.

Then finally, one final glance over his left shoulder as the ball carrier reached the edge of the penalty area, to know the whereabouts of Italy #11 (ensure he was not going to dart in front towards the near post), before adjusting his body shape so he was on the half-turn and not facing his own goal (own-goal risk) and maintaining his recovery line inside the near post to block any low cross / pass attempt into #11 who would have had an open goal tap-in.
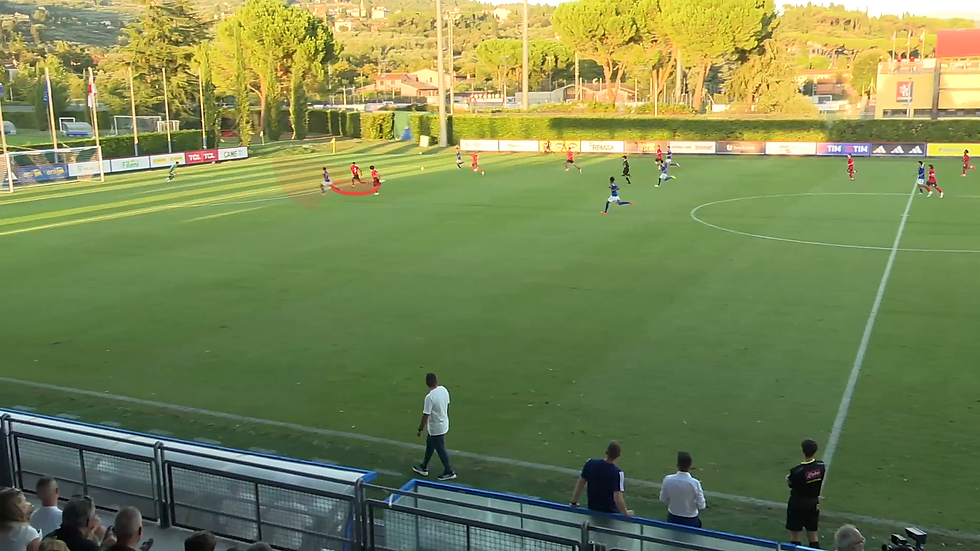
The Italy #9 opted to shoot from the acute angle forcing a save from the England goalkeeper, with #6 O’Keefe, who to his credit, recovered in time to at least provide interference to Italy #11 at the point of shooting, cleared the rebound.
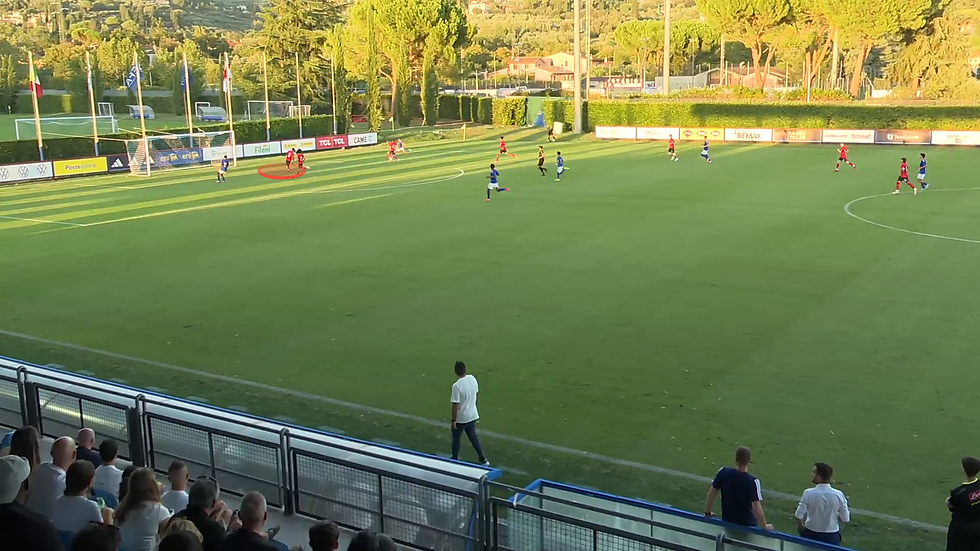
While only my interpretation, my take on this sequence was that Kapotwe, in the assessment of all these details: being the last defender, his RB being too advanced to provide cover, the wide position of the ball, the distance to the ball carrier, the distance to goal, the advanced and central position of Italy #11 - who would become free for a pass if Kapotwe engaged the ball, and teammate #6 O’Keefe potentially recovering to address the ball carrier, informed Kapotwe's decision to recover directly towards goal, in line with the near post, to block any direct pass across to Italy #11, as opposed to dropping diagonally and narrowing the distance between him and the ball.
#4 Zac Wattley (LCB): Right-footed. A number of his left-footed possession actions - attempted carries, passes and clearances - led to ball losses, but too small a sample size to draw any conclusions. Typically received on his left foot to set a pass with his right foot, and due to England's build-up plan, his main responsibility in these phases was to pass short and wide to the free left-back.
He won the majority of his duels, with most being ground-based. In the 1st Half, the most typical scenario of these duels was balls over the top of the England defensive line into the left channel (Italy RW). Here, Wattley demonstrated defensive anticipation, consistently on the half-turn, ready to run back to defend depth and was often required to defend 1v1 outside and inside the box. The timing of his defensive engagement proved successful on numerous occasions, with his right-footedness appearing to be the reason for his tendency to lead with his right leg when slide tackling.
As per the sequence shown in the Out of Possession section (see below for reminder), the LCB displayed a number of encouraging intentions when defending depth - initial anticipation to drop, assessing of danger, remaining calm under pressure, not overcommitting, delaying attacks to allow for recovery support - all of which informed his decisions and actions.
In the GIF above, Wattley initially accelerates directly towards his own goal before scanning to see the LB providing defensive cover, so he therefore moved diagonally across to close down the ball carrier and narrow the shooting angle, without over committing to allow a chop inside.
#3 Oliver Crofts (LB): Heavily utilised during England's build-up, receiving low and wide before either playing vertically into the England LW's feet or diagonally inside to the LCM, following clear patterns of play. In the 2nd Half, Crofts showcased a wider range of passing ability with one successful diagonal switch to the RW (space to execute), and some incisive, zipped diagonal passes inside across varied distances.
On occasions, Crofts showcased technical ability and athleticism to play against the Italy RCM's pressure, both on the inside and outside. Receiving stationary before a sharp shift of direction and speed to bypass opponents on the carry before playing forward. Willing support runner in the opposition half, offering overlap and underlap options in the final third. Culpable for Italy second goal, overrunning the ball and inaccurate forward pass leading to a counterattack.
Defensively, Crofts performed his role as backline cover when the far-sided defender during England high pressure moments, clearing danger a couple of times. He was guilty of ball watching on occasions, unaware of runners on his blindside and adopting a square body shape when there was potential threat in behind. Executed a few hooked clearances when dealing with balls over and facing his own goal.
#6 Arthur O’Keefe (RCM): Performed the '6' role in England's central midfield trio. High levels of defensive work rate and actions. Landed on and competed for second balls and made numerous interceptions as a result of his anticipation and positioning. Made lots of recovery runs in transition to provide defensive support and protect the box, making a few important blocks and clearances.
Due to Italy's defensive system, he was usually closely marked when receiving but showed composure and awareness to protect the ball and retain possession with passes out to fullbacks or recycling play. There were a couple of ball losses when receiving inside the Italy block. His most progressive passes were short-distanced passes through the lines into #10's feet upon regain; his few attempts over longer distances were unsuccessful.
#8 Luca Eden (LCM): Performed the '8' role in England's central midfield trio, operating box-to-box and involved in all phases of play, in and out of possession. Showcased technical, physical and tactical quality in the lead-up and finish to England's opening goal, which he scored. Right-footed but executed a few successful progressive passes under pressure with his left foot, including the assist for England's second goal, a low cross across the face of goal.
Comfortable receiving, protecting, and manipulating the ball under back pressure and in small spaces; utilising this skill in both build-up play and the final third. Multiple dynamic combination play involvements. Selfless off-ball support, providing overlap, underlap, and depth runs to receive himself and create space for teammates. Found pockets of space between the lines and within the Italy defensive line to occupy and exploit on England's left-hand side. Executed a couple of successful switches of play, showing a range of passing techniques including aerial and driven. A few ball losses, often a result of attempting to be progressive in possession with a pass or carry.
Tenacious out of possession but appeared controlled. Accelerated to apply quick pressure but a few instances of decelerating to perform defensive action e.g. jockey or tackle. Willing recovery runner. Tracked runners and covered space between the England LB and LCB.
#7 Eden Mahoney-Smith (RW): Left-footed and heavily utilised. Typically received to feet on the right-wing touchline before cutting inside, using quick body feints and shifts of the ball to bypass opponents after drawing pressure, where he then looked to dribble, pass or combine diagonally. Rarely attempted to attack the Italy LB on the outside.
Lots of positive attacking intent and actions, although end product was mixed, often as a result of his decision-making. At times, Mahoney-Smith was guilty of forcing play in the final third, particularly with his shot selection and penetrating pass attempts. On the occasions when more composure was shown, for example switching play or making a short combination pass, it resulted in box entries and goalscoring opportunities. However, attacking quickly and directly once entering the final third appeared to be a team intention, so this needs to be factored into this observation.
Aggressive and effective pressing in high defensive phases and consistently supported his RB in the defensive third, tracking runners and applying pressure to the ball carrier to disrupt, intercept and block crosses. Willing to contest and compete long balls played towards him from goalkeeper to maintain team territory.
#10 Luis Munoz (AM) (C): Performed the '10' role in England's central midfield trio. Operated as the most advanced midfielder, positioning himself between the Italy midfield and defensive lines to find pockets of space to receive line breaking passes. Typically orientated himself to the right-hand side of the pitch but not fixed positionally, at times drifting out to the LW during build-up.
Attacking involvements included short passing combinations, often with the RW, showing a tendency to attempt first-time flicks to bypass opponents before spinning and making a forward run to offer an option to receive again. Made runs beyond, often into the spaces between the Italy CBs and FBs. Attempting penetrating through balls for CF runs behind the opposition backline. Protected the ball under pressure in central areas of the opposition half to retain possession and sustain attacks.
Defensively, Munoz played in the forward line alongside the CF in high and mid-block defensive phases and dropped deeper when England were protecting their own defensive third.
#11 Jaice Dore (LW): Right-footed. Played a similar role to #7 on the RW and had similar mixed attacking output too. Typically received to feet on the left-wing touchline before looking to cut inside after using quick body feints and shifts of the ball to bypass opponents, where he then looked to dribble or combine diagonally, or play a penetrating pass beyond. Provided the assist for England's first goal and the pre-assist for the second displaying these attacking traits. Plus, won a few fouls from dribbles.
A consistent target for England's deep build-up patterns, although the Italy RB bettered him in duels on multiple occasions, especially towards the end of the 1st Half where he appeared to lose confidence. Struggled to receive and retain vertical passes from the England LB due to back pressure, albeit due to England's repetitve build-up pattens it became easier for the Italy RB to anticipate and pressurise, plus he had the advantage of momentum. However, Dore failed to display nor attempt much separation movement to pose his opponent any real dilemmas in these instances. He recovered and improved early in the 2nd Half, with involvement in some progressive combination play on the England LW leading to some attacks.
Out of possession, he pressed the Italy RB aggressively out wide at trigger moments, forcing some turnovers and supported the England LB in their own defensive third, much like the RW did on the oppositre flank.
#9 Jaden Maghoma (CF): Consistently offered runs beyond the Italy defensive line, both centrally between the CBs and into channels. Scored England's second goal with a close-range, sliding finish following awareness and intentional movement to run into the box on the blindside of the far-side CB. Limited attacking involvements but showcased a willingness to provide a CF link-up option, receving into feet before setting back or flicking first-time to support runners, with a few successes executing this latter ability in the 2nd Half.
Without the ball, Maghoma displayed aggressive pressing in high defensive phases and consistently hassled CBs in contested moments, ensuring any England long balls forward were invariably competed for on first contact (directly) and second balls (allowing time for teammate support to arrive), denying Italy easy clearance opportunities.
Substitutions
#12 Francis Boggan (RCB): Took captain armband after coming. Executed a number of disguised, line-breaking punch passes into central midfield under pressure. Anticipated and intercepted a few through ball attempts behind the England backline. Impressive cameo.
#13 Thomas Armytage (GK): Left-footed. Majority of involvements were in possession. At fault for the Italy third, and winning, goal, after attempting a short, vertical pass between two opponents in own area when under pressure leading to a ball loss and an immediate shot on goal when other nearby passing options were available. There was also one misplaced pass when under pressure prior to this.
#14 Travis Chilard-Martin (LB): No notes.
#15 Iago Mendes Da Silva (RB): Consistently offered a support option in buildup, pulling wide to provide a passing option around the Italy block. Providing attacking support in the opposition half, offering passing options both below and ahead (overlaps and underlaps) of the ball.
#16 Concilio Tonebi (LCB): No notes.
#17 Jaylen Bolton (RCM): Played the '6' role in England's central midfield trio, replacing #6 as the DM. Notable actions included receiving under pressure in central midfield before gliding forward on the carry and releasing a straight pass in behind for the RW's diagonal run beyond, as well as playing an intricate, disguised, left-footed reverse line-breaking pass into #18s path to create a shooting opportunity.
#18 Charlie Robinson (LCM): Played the '8' role in England's central midfield trio. Started as the LCM before moving to RCM after #17 came on. Notable actions included playing a disguised, reverse line-breaking pass into #10 and nearly executing a half-volleyed penetrating pass in behind the Italy defensive line using the outside of his right foot.
#19 Rico Sealy (AM): Played the '10' role in England's central midfield trio, replacing #10 as the AM. Showcased some close control and body feints to disguise actions and bypass opponents. Became more involved and effective when drifting over towards the RW where he looked to play short combinations and attack 1v1 to create crossing opportunities.
#20 Shakeel Charles (LW): No notes.
#21 Ashiah Haughton Sinclair (CF): Played CF role. Dropped to receive between the lines and link play. Aggressive presser out of possession, hassled opponents in contested moments. One notable attacking action was receivng under pressure on the edge of the box before playing a very intricate diagonal through ball in behind the Italy defensive line to find a teammate inside the box.
#23 Eliah Semakula (RW): Left-footed. Dropped to receive to feet but also willing to run beyond on the RW. Looked to play short combinations, dribble inside and shoot, although on occasions his decision to shoot was questionable with passing / crossing options appearing more advantageous. Demonstrated separation movement and pace to run beyond.
#22 Charlie Mountain (GK): Unused substitute.
Italy Team Observations
In Possession
As detailed in England's out of possession section, Italy's main attacking tactics were direct balls for their forward line and attacking transitions, with an emphasis on verticality and playing at speed, rather than relying on any single individual possessing blistering pace. While not to detract from Italy's individual technical qualities, the team's high energy, relentless running and duelling were also factors in their attacking threat and shot volume.
Operating from their 4-3-1-2 system, Italy's backline repeatedly went long from deep, aiming for balls into or beyond their highly mobile forward line with both #11 and #9 willing runners behind and into channels. Additional support was never too far behind, with #10 (AM), #7 (LCM), #8 (RCM) and usually the ball-side FB advancing and arriving in the final third to join attacks and compete in duels to maintain territory.
Italy aimed to further maximise their two-forward system in attacking transitions, with the pair remaining high out of possession, offering an immediate vertical passing option upon regain, a threat in behind and ball-carrying ability. This direct and often central counterattack threat resulted in multiple one-on-one situations with the England goalkeeper, only for Italy to be let down by their finishing.
Out of Possession
With England looking to build-up from deep and Italy happy to apply high pressure, the two sides' respective approaches suited one another, with each achieving success with their corresponding tactic.
From an Italy perspective, their 4-1-3-2 high block, which prioritised blocking England playing through, had a default narrowness. England were therefore encouraged into playing around the block which they did. While, as outlined in England's in possession section, this led to frequent England progressions in wide areas and also placed a large physical demand on their midfield unit, Italy were prepared and willing to press aggressively in wide areas, knowing that upon regain they had multiple central targets (#10, #9, #11) to immediately play into.
When defending their own half, Italy dropped into a 4-3-1-2. Their midfield diamond contracted but the AM #10 maintained his slightly advanced position within the midfield unit, with the ever-mobile outside CMs tasked with covering width and tucking inside to support the DM. Due to England's propensity to attack quickly in Italy's half, recovery runs and pressure on the ball from the midfield unit were more important than specific defensive positioning.
Italy Player Observations
#1 Lorenzo Minicucci (GK): No notes.
#2 Mirko Danza (RB) (C): Consistently provided attacking support on the RW, offering a wide passing option and making overlapping runs. Delivered with quality in the final third, with low crosses and cutbacks. Aggressive out of possession, tightly marking and applying pressure to England LW during build-up. This aggression helped him win a number of duels, but was also the reason he lost a few, namely England's opening goal where he jumped to intercept the ball when second favourite and was bypassed.
#5 Lorenzo Allara (RCB): Frequently required to cover behind the Italy RB which he anticipated and dealt with the danger, namely balls and runners into the channel. Played a couple of disguised line-breaking passes into the Italy DM under pressure from the England CF.
#6 Rubens Nebatumbu (LCB): Left-footed. No other notes.
#3 Niccolò Chieffallo (LB): Left-footed. Showcased high energy and work rate to get up and down the LW in attack and defence. No other notes.
#4 Marco Vaccarella (DM): Demanding out of possession role, as required to protect central areas, shift side-to-side across the pitch, providing cover for the outside CMs who jumped wide to press the England FBs. Multiple instances of punching accurate line-breaking into advanced teammates under pressure and in congested central areas, sometimes first-time. Witnessed lots of scanning which aided his ball retention and progression.
#8 Gabriel Tedesco (RCM): Demanding OOP role, as required to start centrally before jumping out to the England FB on his side - large and repeated distances to cover. Also, needed to shift across the pitch to provide cover and midfield compactness when the ball was on the far-side.
#10 Lorenzo Vitali (AM): Set-piece taker. Right-footed. No other notes.
#7 Sean Luis Ebagua (LCM): Demanding OOP role, as required to start centrally before jumping out to the England FB on his side - large and repeated distances to cover. Also, needed to shift across the pitch to provide cover and midfield compactness when the ball was on the far-side.
#9 Lorenzo Sassetti (FOR): Consistently offered runs beyond the England backline. Quality finish for Italy's second goal.
#11 Leonard Maria Lima Ramalho (FOR): Won a number of early duels against his CB opponent. As often tightly marked in build-up phases, attempted first-time flicks for teammates to run onto when passes fired into his feet as a link option - mixed success.
Substitutions
#12 Samuele Spanò (GK): Unused substitute.
#13 Saverio Mesecorto: No notes.
#14 Mattia Mirabella: Unused substitute.
#15 Fabrizio Pasotti: Unused substitute.
#16 Giulio Caccucciolo: Unused substitute.
#17 Alessandro Gennaro Esposito: No notes.
#18 Davide Tilli: No notes.
#19 Francesco Buondonno: No notes.
#20 Mattia Pica: No notes.
#21 Enzo Diofebo: No notes.
#23 Mark Chidozie Cordopatri: No notes.

Comments